
Product View |
 See larger image and other views (with zoom) |
Product Screenshots |
||||
|
 |
 |
 |
|
 |
 |
 |
 |
|
Product Details |
|||||
| Manufacturer AGPtek |
Brand AGPtek |
||||
| Check All Offers | Add to Wish List | Customer Reviews |
Features
- 1.Easy to use dialing speed control. Optional Foot pedal for easy operation.
- 2.Improved Version : Quiet and smooth – very low vibration design for comfort grip
- 3.Improved hand piece cable ending design : so the cable will not loose out easily
- 4.Improved hand piece with fan and vents: better heat radiation to prevent overheating during a long period of usage.
- 5.Improved twisted-lock design: easy to secure and remove the bits.
Description
Specifications:
Main Part
Voltage: AC 110V/60Hz
Power output: 15W
Hand piece part
Voltage: DC 3-12V
Rotation: 4,000rpm to 30,000 rpm
Sanding Bands: 80″/150″/240″
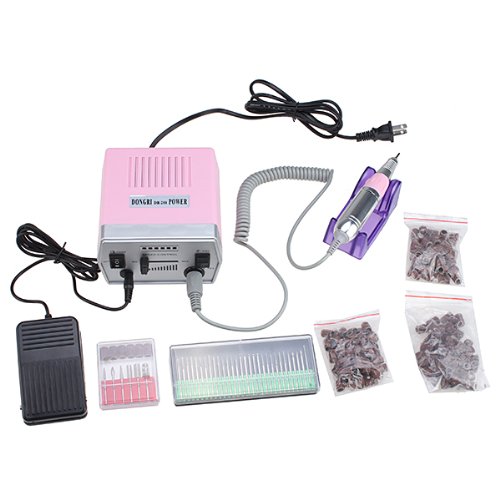
Package include:
Electric Nail Drill Machine : Main control + Hand piece
Table Stand for hand piece
Foot Pedal Power Control
30 x Electric Nail File Drill Bits (With 3/32″ (2.35mm) shank size)
6 Optional Bits / Filing Heads (includes 1pc of emery rod with 4 sanding bands)
100 pieces of Sanding Bands with degree 80″
100 pieces of Sanding Bands with degree 150″
100 pieces of Sanding Bands with degree 240″
Installation and wire connection:
1. Connect the 5-pin plug of the portable grinding head/hand piece to the output socket at the main panel.
2. Connect the pedal switch to the foot S/W socket.
3. Select grinding mould of different sizes according to actual requirements, and fasten/secure it into the front of the portable grinding head by turning the shaft lock.
4. Switch the speed control to the left.
5. Connect with the main source power.
Operation Detail:
1. Press the function switch on the left to Hand for manual control, the indicator will be on and the grinding head starts to move slowly. The LED 1~2 will be on.
2. Turn the speed control to the right to accelerate the grinding head and all the LED indicators for the speed will be on.
3. When the function switch is pressed to the FOOT, step on the pedal the speed will be accelerated, and loose the foot, the speed will be decreased. (foot switch is optional)
4. The turning directions can be swapped: FWD means clockwise and REV means counterclockwise.
5. Adjust the speed of the grinding head within a reasonable range.
6. Please adjust the hand piece to the lowest speed before changing forward/backward direction or before turn off the machine.
Leave a comment
You must be logged in to post a comment.